There’s something deeply satisfying about pointing at a piece of furniture in your home and saying “yeah, I made that.” A headboard is one of the best beginner projects to get that bragging right, because it looks impressive, transforms a bedroom instantly, and — here’s the secret nobody at the fancy furniture store wants you to know — it’s genuinely easy to build a headboard yourself. We’re talking under a hundred euros, a single weekend, and tools that mostly fit in a drawer. The custom-upholstered headboards selling for €400 to €800 in showrooms are using the same basic techniques you’re about to learn.
If you can use a staple gun and a measuring tape, you can pull this off. Let’s walk through how.
Why DIY Is Actually the Smart Move Here
Before we dive into how-to, a quick reality check on why this project punches above its weight. Store-bought upholstered headboards typically cost between €150 and €800, and the moment you want a specific size, fabric, or shape, prices jump fast. When you build a headboard yourself, you control every variable — width, height, fabric, padding thickness, mounting style — and you spend roughly a third of what you’d pay retail.
The other reason this project is beginner gold: the construction is forgiving. The fabric covers all the imperfect cuts, uneven staples, and slightly-off-center bits. Mistakes that would ruin a piece of visible furniture are completely hidden under the upholstery. You don’t need to be a carpenter. You need to be patient and willing to follow a few basic principles.
Tools You’ll Actually Need
Here’s the genuinely short list. To build a headboard with a clean, modern panel design, you need:
A staple gun — manual is fine, electric is faster and easier on your hand. This is your single most important tool.
A measuring tape and pencil — for marking the plywood and lining up your fabric.
Sharp scissors or a utility knife — for cutting fabric, batting, and foam.
A drill with screwdriver bits — for attaching legs, mounting brackets, or assembling a frame.
That’s the core kit. If you want to get fancier — say, a curved top edge — you’ll also want a jigsaw. If you can borrow one, great. If not, most hardware stores will cut plywood to shape for you in-store, often for free or a small fee. That single tip saves beginners so much grief.
You don’t need a sewing machine. You don’t need a sander (mostly). You don’t need any specialty woodworking tools. This is one of the rare DIY projects where “I have basic tools” actually means “I have everything I need.”

Materials Shopping List
Now for what gets stapled together to build a headboard from scratch:
Plywood, around 1.5 cm (½ inch) thick — this is your base. Standard bed widths: a queen headboard is typically around 160 cm wide, a king around 195 cm. Add 10 cm on each side for visual balance. Height is your call — most headboards sit 35 to 70 cm above the mattress.
Foam padding, 5 cm thick — high-density upholstery foam is best, but a foam mattress topper cut to size is the budget-friendly trick most DIY blogs swear by. It’s cheaper and easier to find.
Batting (the fluffy stuff) — gives the headboard a smooth, rounded look and softens any edges of the foam underneath. Buy enough to wrap the entire front and tuck around the back.
Upholstery-grade fabric — heavier than regular fabric, more durable, and looks much better on a finished piece. Linen blends, velvet, and cotton-poly upholstery weights all work beautifully. Plan for fabric that’s at least 20 cm wider and longer than your plywood on every side.
Spray adhesive (optional but helpful) — keeps foam and batting in place while you wrestle with the fabric.
Staples, 8–10 mm length, matched to your staple gun.
Mounting hardware — French cleat, D-rings, or bed-frame brackets, depending on how you’ll attach it.
Total cost typically lands somewhere between €60 and €120, depending on fabric choice. Velvet costs more. Plain linen is delightfully cheap.
Step One: Plan and Measure Twice
Before you cut anything, make a few key decisions. First, the size. Measure your bed’s width (or your mattress) and decide how much overhang you want on each side. A few extra centimeters on each side looks intentional and balanced.
Second, the height. Standard ranges from 35 to 70 cm above the mattress. Taller headboards make a dramatic statement; shorter ones feel modern and minimal. If you have a window above your bed, low and wide is your friend.
Third, the mounting method. You can build a headboard that mounts to the wall (French cleat, very secure, looks like a floating headboard), bolts to your bed frame (movable when you rearrange), or sits on its own legs (renter-friendly, no holes in the wall). Pick before you buy materials, because the mount affects how your back panel needs to be finished.
Step Two: Cut the Plywood
If you have a jigsaw and feel confident, cut the plywood to your dimensions yourself. If not — and this is what most first-time builders do — bring your measurements to a hardware store and have them cut it for you. Most stores will do straight cuts for free or a couple of euros.
For a flat-top rectangular shape, you’re done at this step. If you want a curved top, trace your curve using a large bowl, a tray, or even a piece of string tied to a pencil. Cut along the line with a jigsaw, going slowly. Don’t worry about minor wobbles — fabric hides everything.
This is genuinely the only “real” woodworking step required to build a headboard.
Step Three: Add the Foam
Lay your plywood flat on the floor. Cut your foam to match the plywood’s shape exactly. Spray adhesive on the plywood, press the foam down firmly, and let it set for a few minutes.
If your foam is thinner than you’d like, layer two pieces — many people stack a 2.5 cm topper twice for a plusher feel. Trim any overhanging foam with a sharp utility knife or scissors so the edges line up cleanly with the plywood.
Step Four: Wrap with Batting
Lay your batting flat, place the foam-side of your plywood face-down on top. Pull the batting up and over the back, stapling it to the plywood every few centimeters. Work from the center of each side outward, alternating sides as you go to keep tension even.
At the corners, fold like you’re wrapping a present — neat folds, no bunching. Trim excess batting from the back so it lies flat.
The batting is what makes the difference between an amateur-looking project and one that looks store-bought. Don’t skip it.
Step Five: Apply the Fabric
This is the make-or-break step. Lay your fabric on the floor, pattern-side down. Place the batting-covered plywood face-down on top, centering it carefully. If your fabric has a pattern, double-check that it’s running straight before you start stapling.
Pull the fabric over the back, starting at the center top. Staple. Move to the center bottom and pull the fabric taut — not so tight that it distorts the pattern, but firm enough that there are no wrinkles on the front. Staple. Then center left, then center right. Always work in opposing pairs to keep tension even.
From there, work outward from each center point, placing staples every 5 cm or so, alternating sides constantly. When you build a headboard this way — with constant tension checks — you avoid the dreaded saggy, lumpy front that ruins so many DIY attempts.
At the corners, fold neatly and tuck. Trim any excess fabric on the back so it sits flat.
Step Six: Finish and Mount
For a clean back, staple a piece of plain dust-cover fabric or thin plywood over the raw back. This hides the staples and gives the piece a finished look.
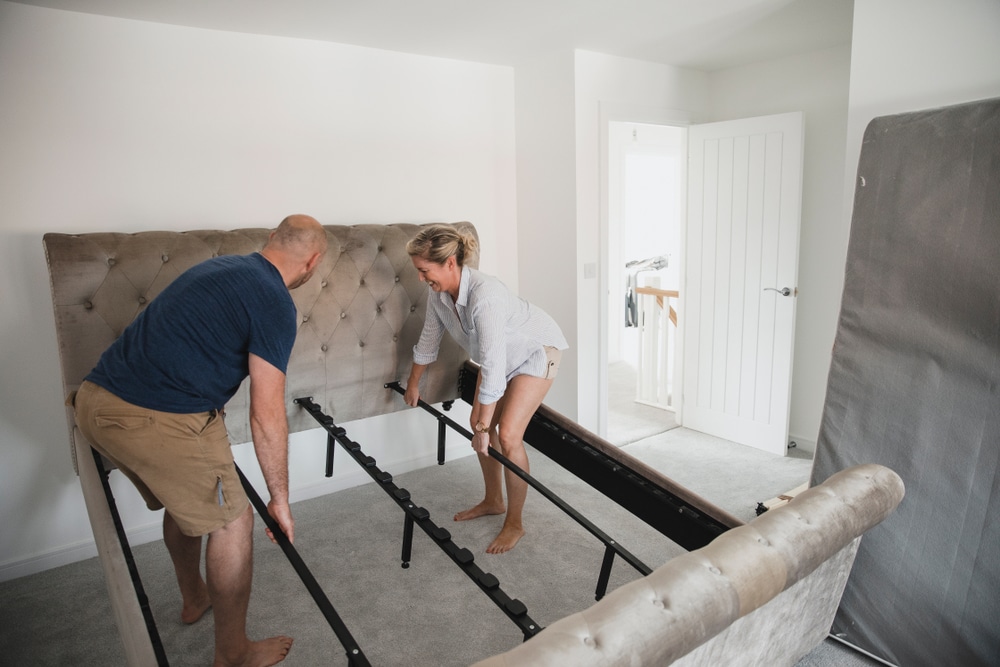
Then mount it. For a wall mount, attach a French cleat to the back and one to the wall (find a stud — a headboard isn’t lightweight). For bed-frame attachment, use bolt-on headboard brackets. For freestanding, attach four bun feet or simple legs to the bottom and slide it behind the bed. You’ve now build a headboard.
A Few Mistakes to Avoid
Don’t pick a fabric that’s too thin — light cotton sheets pull and tear under tension. Stick with proper upholstery fabric.
Don’t over-stretch the fabric trying to remove every tiny wrinkle. You’ll distort the pattern and create weird tight zones.
Don’t forget to check the front while you staple. It’s so easy to get tunnel vision on the back and end up with a wonky finish.
And don’t try to build a headboard for a king-size bed alone. Get a friend to help you wrestle the fabric. It’s two-person work at scale.
The Payoff
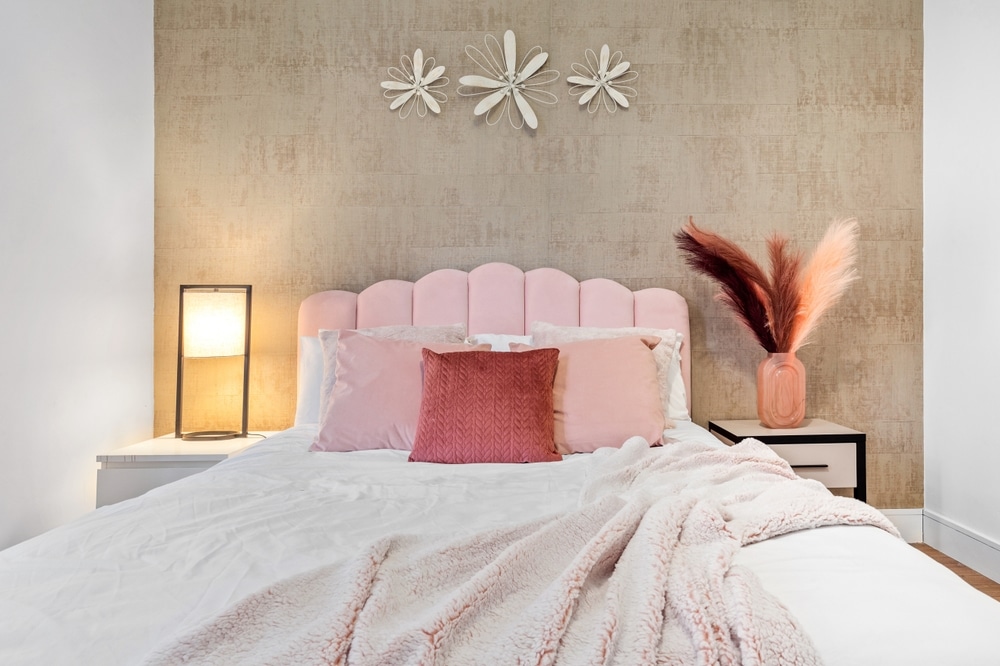
Stand back. Lean against it. Take a photo. You just build a piece of custom furniture for a fraction of retail, in one weekend, with tools that fit in a shoebox. The skills you’ve learned here scale up to chairs, benches, bench cushions, and beyond. Now make the bed and admire your work — preferably with a coffee in hand.
Do you want more amazing tips for DIY Projects in your home? Then visit our DIY Projects page right here