Creating furniture that serves more than one purpose is one of the smartest ways to maximize space in any home. Whether you’re living in a compact apartment, organizing a busy family room, or simply looking for a rewarding weekend project, building a hidden storage ottoman is an excellent choice. A well-designed DIY storage ottoman provides extra seating, a comfortable footrest, and a secret compartment for storing blankets, books, toys, or other household items. The best part is that you don’t need professional woodworking skills to complete the project. With basic tools, affordable materials, and a free weekend, you can create a stylish piece that looks custom-made while adding practical storage to your living space.
Why a Hidden Storage Ottoman Is Worth Building
Furniture prices have increased significantly in recent years, especially for pieces that combine style and functionality. Many store-bought ottomans with storage compartments can cost hundreds of dollars, and even then, they may not perfectly match your home’s décor. Building your own gives you complete control over the size, fabric, color, and finishing details. A DIY storage ottoman allows you to customize every aspect while saving money compared to retail options.
Another advantage is versatility. Hidden storage furniture helps reduce clutter without requiring additional shelving or cabinets. Items that usually create visual mess can be tucked away neatly while remaining easily accessible. Whether you place the ottoman in a living room, bedroom, home office, or playroom, it serves multiple purposes and can adapt as your storage needs change over time.
Planning Your DIY Storage Ottoman Project
Before purchasing materials, it’s important to decide how large your ottoman should be and where it will be used. Measure the available floor space and think about what you plan to store inside. A larger ottoman can accommodate blankets and pillows, while a smaller version may be perfect for magazines, board games, or remote controls. Sketching a simple design beforehand can prevent mistakes and help estimate material requirements more accurately.
The typical DIY storage ottoman consists of a wooden box frame, a hinged lid, foam padding, upholstery fabric, and decorative finishing touches. Most builders choose plywood because it is affordable, durable, and easy to work with using standard tools. By planning carefully before cutting any wood, you’ll streamline the entire building process and avoid unnecessary trips to the hardware store during the weekend.
Gathering the Necessary Materials
One reason this project appeals to beginners is that the material list remains relatively straightforward. You’ll need plywood sheets, wood screws, wood glue, hinges, foam padding, batting, upholstery fabric, and basic finishing supplies. Many homeowners already own common tools such as a drill, screwdriver, measuring tape, staple gun, and circular saw. If not, these tools can often be borrowed or rented at a reasonable cost.
Choosing quality materials will improve the final appearance and durability of your DIY storage ottoman. Medium-density foam creates a comfortable seat, while durable upholstery fabrics such as canvas, microfiber, or performance fabric can withstand regular use. Decorative legs, nailhead trim, or tufting can also be added if you want the finished piece to resemble high-end furniture found in designer showrooms.
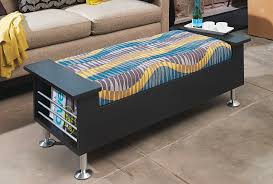
Building the Storage Box
The storage box serves as the foundation of the project and determines the strength of the finished ottoman. Begin by cutting plywood panels according to your planned dimensions. Most ottomans use four side panels, a bottom panel, and a separate top lid. Dry-fitting the pieces before assembly helps ensure all measurements are correct and allows adjustments before permanent fastening.
Once you’re satisfied with the fit, secure the sides using wood glue and screws. Reinforcing the corners provides additional stability and prevents wobbling later. After attaching the bottom panel, check that the box sits level on the floor. This stage may not look exciting yet, but a sturdy foundation is essential for creating a durable DIY storage ottoman that can handle years of daily use.
Adding the Hinged Lid
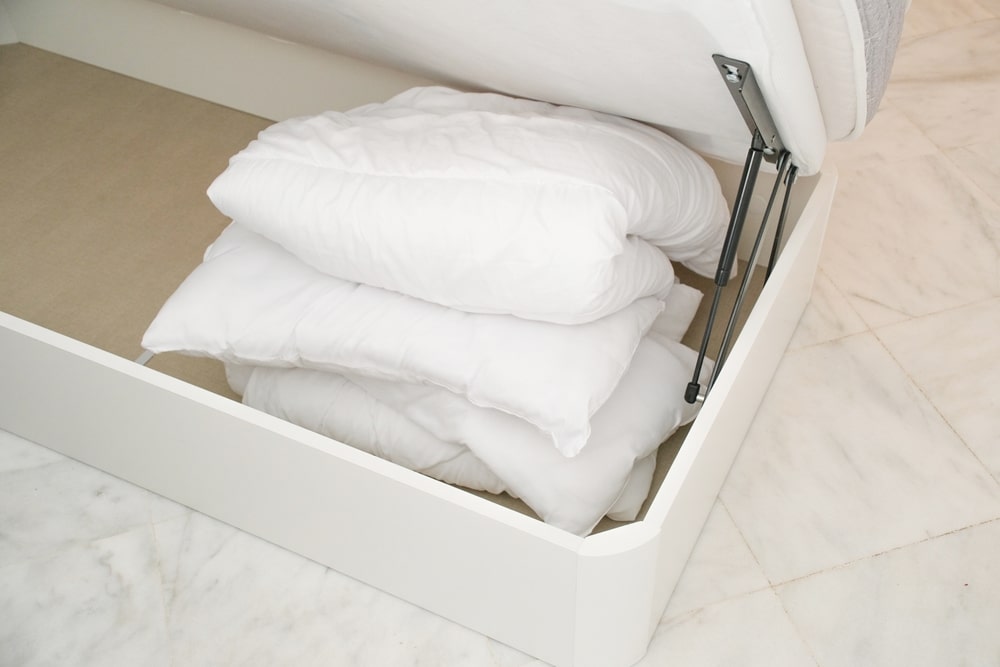
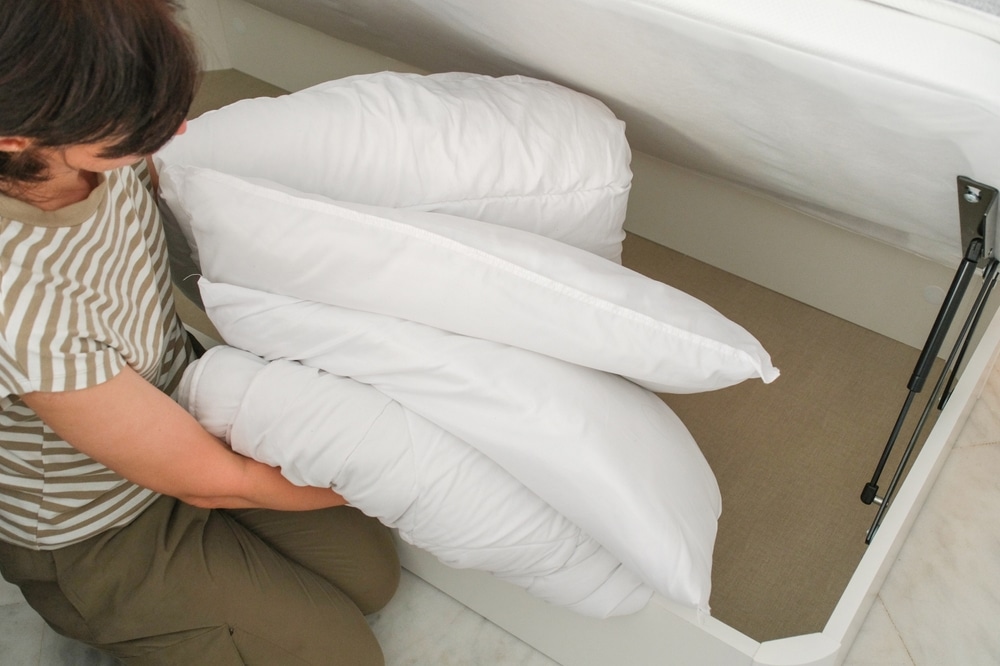
The hidden storage feature depends on a properly functioning lid. After constructing the box, cut the lid panel to match the top dimensions. Attach strong hinges along one side so the lid opens smoothly and stays aligned. Soft-close hinges can be an excellent upgrade because they prevent sudden slamming and reduce wear over time.
Safety should also be considered during this step. Some builders install lid support hinges or gas struts that hold the lid open while accessing stored items. These additions are especially useful in homes with children. A properly installed lid transforms a simple wooden box into a functional DIY storage ottoman that offers convenient hidden storage without sacrificing comfort or appearance.
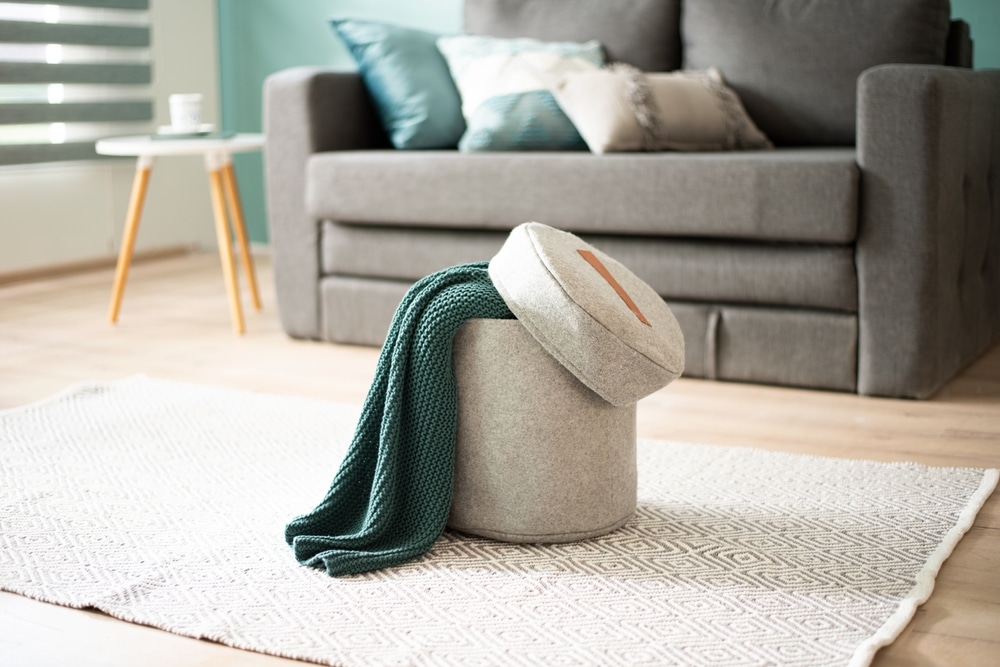
Upholstering for Comfort and Style
Upholstery is where the project truly begins to look like professional furniture. Start by attaching foam padding to the top lid using spray adhesive. Cover the foam with batting to create smooth edges and a polished appearance. The upholstery fabric should then be stretched tightly over the padded lid and secured underneath using a staple gun.
The fabric selection can dramatically influence the final style. Neutral colors work well in modern spaces, while bold patterns can create an eye-catching statement piece. Homeowners often coordinate fabric choices with existing furniture for a cohesive look. At this stage, your DIY storage ottoman starts transitioning from a woodworking project into an attractive decorative feature that complements the room’s overall design.
Personalizing the Design
Customization is one of the biggest advantages of building your own furniture. Decorative furniture legs can elevate the ottoman and give it a more sophisticated appearance. Tufted buttons create a classic luxury aesthetic, while sleek metal accents support a contemporary design style. Some builders even incorporate casters to make the ottoman easier to move around larger rooms.
Paint and stain options further expand the design possibilities. Exposed wooden sections can be stained to highlight natural grain patterns, while painted finishes allow for endless color coordination opportunities. Every design choice contributes to creating a DIY storage ottoman that reflects your personal taste while remaining highly functional and practical for everyday use.
Common Mistakes to Avoid
Even beginner-friendly projects come with potential challenges. One of the most common mistakes is inaccurate measurements. Small errors during cutting can cause panels to fit poorly and create alignment issues during assembly. Taking extra time to measure twice before cutting can save significant frustration later in the process.
Another frequent problem involves choosing fabric that isn’t durable enough for regular use. Decorative fabrics may look beautiful initially but wear out quickly under daily pressure. Builders should also avoid overloading the storage compartment with excessive weight, particularly if the lid hinges are not designed for heavy loads. Careful planning and attention to detail help ensure your DIY storage ottoman remains attractive and functional long after completion.
Maximizing Storage Efficiency
The hidden compartment becomes even more useful when organized effectively. Storage bins, fabric baskets, or dividers can help separate different categories of items inside the ottoman. Instead of creating a large space where everything gets mixed together, simple organization systems improve accessibility and reduce clutter.
Seasonal items are particularly well suited for ottoman storage. During colder months, blankets and throws can be stored inside, while summer accessories can take their place during warmer seasons. This flexibility makes a DIY storage ottoman a practical solution for households looking to make better use of limited space without adding bulky storage furniture to already crowded rooms.
Long-Term Maintenance and Care
Proper maintenance helps preserve both the appearance and functionality of your ottoman. Upholstered surfaces should be vacuumed regularly to remove dust and debris. Any spills should be cleaned promptly according to the fabric manufacturer’s recommendations. Protective fabric treatments can also help resist stains and extend the life of the upholstery.
Wooden components benefit from periodic inspections to ensure screws remain tight and hinges continue operating smoothly. If the ottoman receives heavy daily use, tightening hardware once or twice per year can prevent minor issues from becoming larger repairs. Consistent care allows a DIY storage ottoman to remain a reliable and attractive piece of furniture for many years.
Creating a hidden storage ottoman in a single weekend is a realistic and rewarding project that combines creativity, craftsmanship, and practical home organization. From building the wooden frame to selecting the perfect upholstery fabric, every step offers opportunities to customize the finished piece according to your needs and personal style. The result is furniture that serves multiple purposes while helping reduce household clutter. A well-built DIY storage ottoman provides comfortable seating, hidden storage, and a sense of accomplishment that comes from creating something useful with your own hands. With proper planning and attention to detail, this weekend project can become one of the most valuable additions to your home.
Do you want more amazing tips for DIY Projects in your home? Then visit our DIY Projects page right here