Stainless steel appliances are one of those things you fall in love with at the showroom and start questioning the moment you actually own them. They look magnificent for about forty-five minutes after delivery, and then someone touches the fridge, and you realize you’ve signed up for a lifetime relationship with fingerprints. If you’ve been quietly losing your mind trying to clean stainless steel appliances without leaving behind streaks, smudges, or that weird hazy film, you’re not alone — you’ve just been doing it slightly wrong, like the rest of us. The good news? Once you understand a few principles, getting that mirror-like, smudge-free finish is genuinely easy.
This guide walks you through the actual right way, the products that work, and the mistakes that have been quietly sabotaging your efforts for years.
Why Stainless Steel Smudges in the First Place
Before we get into solutions, it helps to understand the enemy. Stainless steel is a highly reflective surface, which is exactly why it looks so sleek — and exactly why it shows every single fingerprint, water droplet, and grease splatter. Skin oils transfer easily onto the metal, and because the surface is so reflective, even microscopic residue catches the light and looks like a smudge.
Most “smudges” on stainless steel aren’t actually dirt. They’re a thin layer of oil or moisture that’s been smeared around by a paper towel or a dirty cloth. That’s why people who try to clean stainless steel appliances with aggressive scrubbing often end up with worse-looking results than when they started. You’re not removing the smudge — you’re just rearranging it.
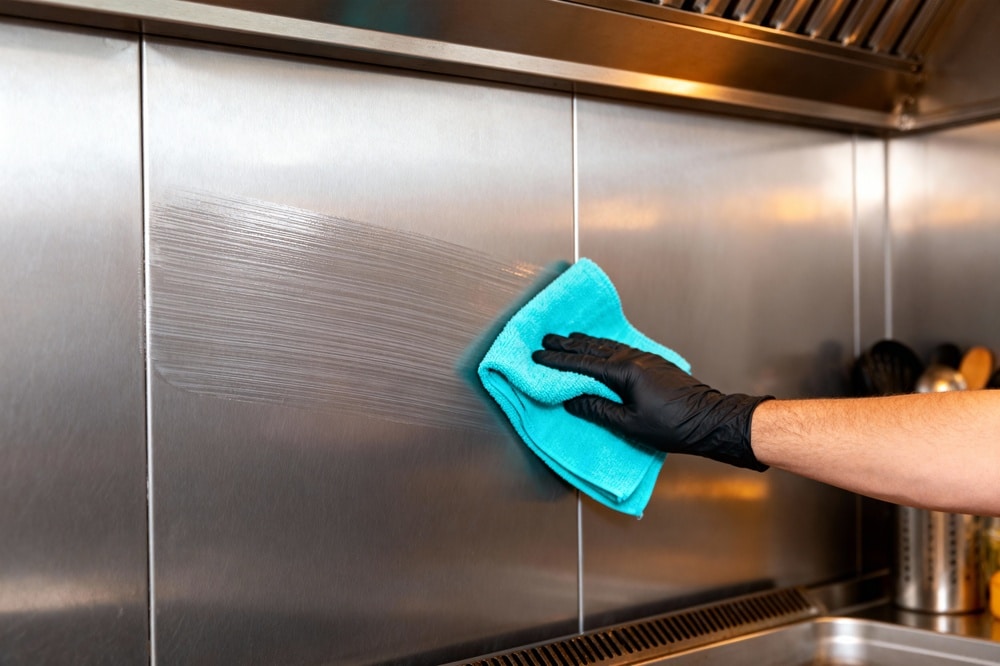
The One Rule That Changes Everything: Follow the Grain
If you take nothing else from this article, take this. Stainless steel has a grain — faint horizontal or vertical lines running across the surface. You can usually see them if you tilt your head and look at the appliance in good light. Always, always wipe in the direction of those lines. Never against them, never in circles.
Wiping against the grain creates streaks that are nearly impossible to buff out. It can also push grime into the tiny grooves of the metal, where it gets stuck and dulls the surface over time. When you clean stainless steel appliances with the grain, the surface stays smooth, the cleaner spreads evenly, and the finish stays uniformly shiny.
This single tip eliminates about 80% of the streaking problems people complain about. It costs nothing and takes zero extra effort — you just have to remember to do it.
Step One: The Right Tools
You don’t need fancy products. You do need the right cloth. Microfiber is the gold standard for stainless steel — it’s soft enough not to scratch, absorbent enough to lift dirt and oil, and lint-free so it doesn’t leave behind tiny fibers.
Avoid paper towels. They feel convenient, but they leave behind small fibers and can actually micro-scratch the surface over time. Avoid scrubbing pads, steel wool, and abrasive sponges entirely — these will permanently damage stainless steel, and once you’ve scratched it, there’s no going back.
Keep at least three clean microfiber cloths on hand: one for cleaning, one for rinsing, and one for buffing dry. Yes, three. This is the secret most people skip, and it’s the difference between professional-looking results and a streaky mess.
Step Two: Choosing a Cleaner That Actually Works
You have options here, ranging from “literally already in your kitchen” to “specialty product.” All of them can work to clean stainless steel appliances effectively if used correctly.
Warm water and dish soap. Boring, but genuinely the best everyday cleaner. Mix a teaspoon of dish soap into a quart of warm water. Mild, safe, and effective for daily fingerprints and light grime. Most appliance manufacturers, including KitchenAid and Whirlpool, recommend this as the default method.
Vinegar and water. A 1:1 mix of white vinegar and water in a spray bottle works well for cutting grease and water spots. Important caveat: don’t let vinegar sit on the surface for long — the acidity can damage the protective layer if left too long. Spray, wipe immediately, rinse.
Specialized stainless steel cleaners. Products like Weiman, Bar Keepers Friend (the spray, not the powder), and affresh are formulated specifically for these surfaces. They work well, but they’re not magic — they still need to be used correctly, with the grain, and buffed dry.
What to avoid: bleach, ammonia-based cleaners, citrus-based cleaners left on too long, and any abrasive powder. These can damage the finish and cause discoloration that you absolutely cannot undo.
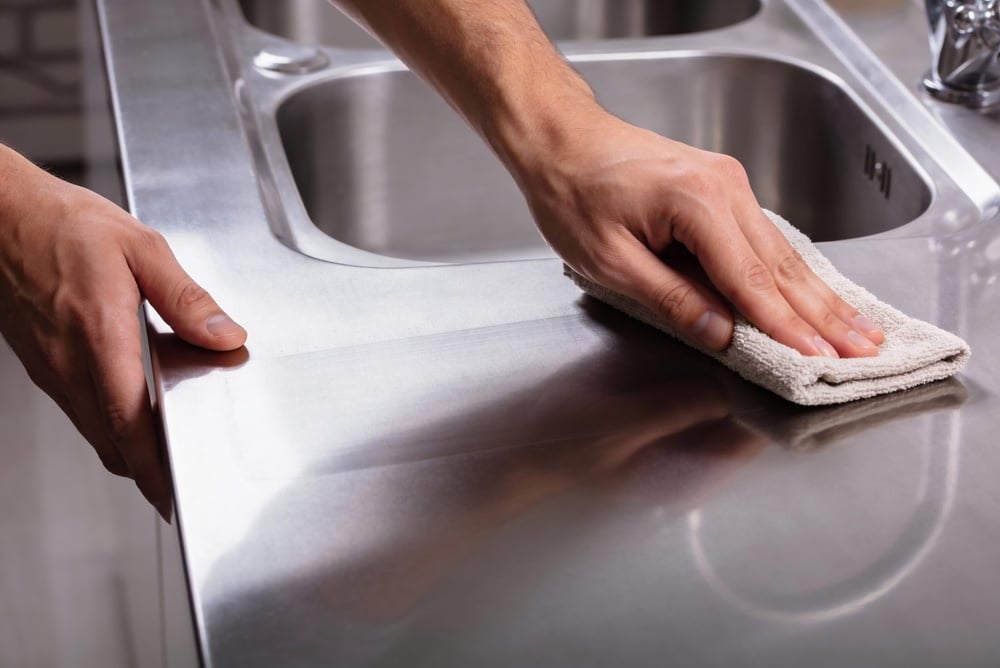
Step Three: The Actual Cleaning Process
Here’s the method that works every time when you want to clean stainless steel appliances properly:
First, identify the direction of the grain on the appliance. Look closely — most refrigerators and dishwashers have horizontal grain, while some ovens and ranges have vertical grain. Different surfaces on the same appliance can have different grain directions, so check each panel.
Second, apply your cleaner to the cloth, not directly to the appliance. Spraying directly onto stainless steel often leads to over-saturation and streaking. Damp cloth, light pressure.
Third, wipe with the grain in long, even strokes. Don’t go in circles. Don’t rub aggressively at one spot. Cover the whole surface in one direction.
Fourth, take a second clean cloth dampened with plain warm water and wipe the surface again, still with the grain, to remove any cleaner residue.
Fifth — and this is the step almost everyone skips — use a third clean, dry microfiber cloth to buff the surface dry. Always with the grain. This is what eliminates water spots and brings out the shine. If you skip the buffing, you’ll always have streaks.
Step Four: The Polishing Trick Nobody Talks About
Want to know why some kitchens look magazine-ready and yours doesn’t, even when you clean stainless steel appliances regularly? Polish.
After cleaning and drying, put a few drops of olive oil, mineral oil, or baby oil on a clean microfiber cloth. Buff lightly across the surface in the direction of the grain. The oil fills in microscopic grooves, adds depth to the finish, and creates a thin barrier that repels fingerprints and water.
Don’t overdo it — you want a sheen, not a slick. Wipe off any excess with a separate clean cloth. Done well, this trick keeps appliances looking clean for noticeably longer between cleanings.
Common Mistakes That Will Sabotage You
Here are the things people do constantly that ruin their results.
Using a dirty cloth. A greasy or already-used cloth just smears oil around. Always start with a clean one.
Wiping in circles. This is muscle memory from cleaning windows or counters, and it’s the fastest way to leave swirl marks on stainless steel.
Spraying cleaner directly onto the appliance. Too much liquid in one spot leads to streaks. Apply to the cloth instead.
Cleaning when the appliance is hot. Cleaners evaporate too fast on a warm oven or recently-used cooktop, leaving residue. Wait until things cool down.
Using paper towels. They feel right but they shed fibers and can micro-scratch. Microfiber every time.
Skipping the dry buff. This is non-negotiable. If you don’t buff dry, you’ll have streaks. Period.
People who try to clean stainless steel appliances quickly without buffing always wonder why their fridge looks worse after cleaning than before. Now you know.
Maintenance: How to Keep It That Way
Deep cleans are great, but daily habits keep things looking sharp without much effort. Wipe high-touch areas (handles, doors near handles, control panels) with a damp microfiber cloth every couple of days. This prevents oil buildup, which is what makes stainless steel look dingy over time.
If you live in a hard water area, dry visible droplets quickly — they’ll leave mineral spots if left to evaporate on their own. Keep a small microfiber cloth in a drawer near each major appliance for quick touch-ups.
Once a week, do the proper full clean: cloth, cleaner, rinse, buff, optional polish. Once a month, give it the full polish treatment. This rhythm keeps things looking great without becoming a chore.
When You Have Black Stainless or Fingerprint-Resistant Finishes
A quick note for newer kitchens: black stainless steel and fingerprint-resistant finishes have a special coating that requires gentler treatment. Stick to warm water and dish soap with a soft microfiber cloth — skip the vinegar, skip specialty cleaners, and definitely skip oils unless your manual specifically allows them. The coating is what makes these finishes resist fingerprints in the first place, and harsh cleaners can wear it down.
To clean stainless steel appliances and actually get a smudge-free, mirror-like finish: use microfiber cloths, wipe with the grain, apply cleaner to the cloth (not the appliance), rinse, and always buff dry. That’s the entire game. The fancy products help a little, but technique is what separates streaky from showroom. Now go look at your fridge. It’s about to have a much better week.
Do you want more amazing tips to clean your home? Then visit our Cleaning & Maintenance page right here