Mounting curtains might seem like one of those small home projects you can rush through on a Saturday afternoon. But if you have ever stepped back and noticed a crooked rod or sagging brackets, you know it matters more than it looks. Learning how to mount your curtain rod the right way the first time saves you time, prevents wall damage, and gives your room a polished finish. Curtains frame your windows, influence how light enters the space, and even affect how tall your ceilings appear. Getting the details right makes a surprising difference in both function and style.
Why Proper Placement Matters
Before you mount your curtain rod, it helps to understand why placement is so important. Curtains are not just decorative fabric. They control privacy, filter sunlight, reduce glare on screens, and can even help with insulation. If the rod is too low, your ceilings may look shorter. If it is too narrow, the window can seem cramped and smaller than it really is.
Design experts often recommend hanging curtain rods higher and wider than the actual window frame. Placing the rod about four to six inches above the window trim, or even closer to the ceiling in some rooms, creates the illusion of height. Extending the rod several inches beyond each side of the window allows the curtains to stack neatly without blocking natural light.
When you mount your curtain rod thoughtfully, you are shaping how the entire room feels. It is a small adjustment with a big visual payoff.
Choosing the Right Tools and Hardware
Preparation is everything when you mount your curtain rod. The right tools make the process smoother and help ensure the rod stays secure for years. At a minimum, you will need a measuring tape, a level, a pencil, a drill, screws, wall anchors if necessary, and a screwdriver.
The type of hardware you choose depends on your wall material and the weight of your curtains. Lightweight sheer panels can usually be supported by basic brackets and screws. Heavier blackout curtains or layered drapes require sturdier brackets and possibly additional center supports to prevent sagging.
Skipping wall anchors in drywall is one of the most common mistakes homeowners make. Drywall alone is not strong enough to hold significant weight. If you cannot drill directly into a wall stud, anchors are essential. Taking a few extra minutes to gather the proper hardware before you mount your curtain rod can prevent frustrating repairs later.
Measuring for Perfect Height and Width
Accurate measurements are the backbone of a successful installation. Before you mount your curtain rod, measure the width of your window, including the trim. Then decide how far beyond the frame you want the rod to extend. A general rule is three to six inches on each side, though wider extensions can create a more dramatic look.
Height is equally important. For a standard appearance, position the rod four to six inches above the window frame. If you want to create a sense of grandeur, you can mount the rod closer to the ceiling. Just make sure there is enough wall space for the brackets.
Use a level when marking your bracket positions. Even if your measurements are perfect, a slightly tilted rod will stand out immediately. Double check your pencil marks before drilling any holes. Once you mount your curtain rod, adjusting misplaced holes becomes more complicated and may require patching and repainting.
Common Mistakes When You mount your curtain rod
There are several avoidable errors that can undermine your efforts when you mount your curtain rod. One of the biggest is eyeballing the placement instead of measuring. What looks straight to the naked eye is often slightly off.
Another common issue is ignoring the curtain length. Curtains that are too short can make a room feel unfinished. Ideally, curtains should either just touch the floor, hover about half an inch above it, or puddle slightly for a more dramatic look. Installing the rod without considering fabric length can lead to awkward gaps.
It is also important to secure brackets firmly. If you rush and fail to tighten screws properly, the rod may loosen over time. Taking care during installation ensures that when you mount your curtain rod, it remains stable and aligned.
Step by Step Guide to a Secure Installation
If you want a straightforward approach, follow a simple sequence each time you mount your curtain rod. First, measure and mark your desired height and width. Use a pencil to mark where each bracket will go.
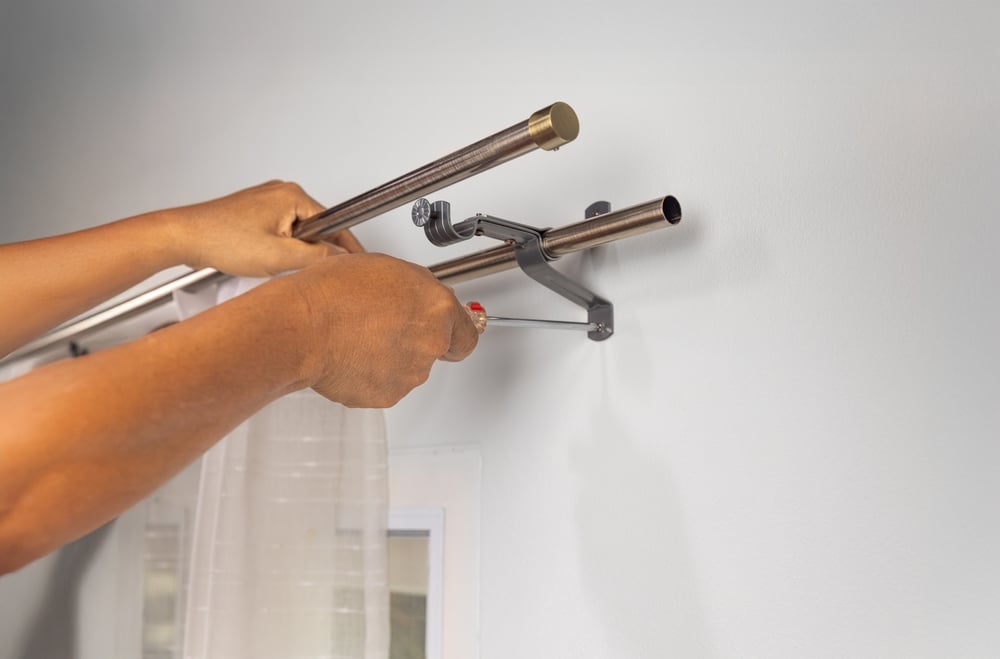
Second, check for studs using a stud finder. If you find a stud at your bracket location, drill directly into it for maximum support. If not, drill pilot holes and insert wall anchors before adding screws.
Third, attach the brackets securely to the wall. Use a level again before tightening everything fully. This extra check helps ensure your rod will sit perfectly straight.
Fourth, place the rod onto the brackets and secure it according to the manufacturer’s instructions. Many rods have small set screws that prevent shifting. After you mount your curtain rod, gently tug on it to confirm it feels stable.
Finally, hang your curtains and step back to assess the look. Make minor adjustments if needed. Following these steps carefully each time you mount your curtain rod will give you consistent, professional looking results.
Working With Different Wall Types
Not all walls are created equal. Drywall, plaster, brick, and concrete each require slightly different techniques. When you mount your curtain rod on drywall, anchors are usually necessary unless you are drilling into studs.
Plaster walls can be more brittle and prone to cracking. Drilling slowly and using appropriate anchors helps reduce damage. For brick or concrete, you will need a masonry drill bit and heavy duty anchors designed for solid materials.
Understanding your wall type before you start helps you choose the correct tools and hardware. This preparation makes it much easier to mount your curtain rod securely without causing unnecessary wear to your walls.
Styling Considerations After Installation
Once you mount your curtain rod, the fun part begins. Curtain style, fabric, and hardware finishes all influence the final look. A sleek metal rod with simple finials suits modern spaces, while decorative wooden rods complement traditional interiors.
Think about how your curtains interact with other elements in the room. Do they match your throw pillows or contrast with your wall color? Are they meant to block light completely or gently diffuse it?
Layering is another popular option. Combining sheer panels with heavier drapes adds depth and flexibility. With a double rod system, you can adjust light and privacy throughout the day. Taking time to style your window treatments properly enhances the effort you put in to mount your curtain rod correctly.
Troubleshooting Crooked or Loose Rods
Even with careful planning, problems can happen. If your rod appears crooked after installation, check whether the brackets are level and evenly spaced. Sometimes simply loosening screws and adjusting slightly can solve the issue.
If the rod sags in the middle, especially with heavy curtains, consider adding a center support bracket. This small addition can dramatically improve stability. If screws are pulling out of the wall, stronger anchors may be necessary.
When you mount your curtain rod securely the first time, these problems are less likely. But if they arise, addressing them promptly prevents further damage and keeps your window treatments looking sharp.
Taking the time to plan, measure, and use the right tools transforms a simple household task into a satisfying upgrade. When you mount your curtain rod with care, you protect your walls, improve your room’s appearance, and ensure your curtains hang exactly as intended. Small details like height, width, and secure brackets make a noticeable difference in both function and style. Instead of rushing through the process, approach it with patience and precision. If you mount your curtain rod thoughtfully and follow proven steps, you will enjoy a polished, professional look that enhances your space for years to come.
Do you want more amazing tips for DIY Projects in your home? Then visit our DIY Projects page right here