
Creating something beautiful and useful from items you already have at home can feel surprisingly rewarding, and that’s exactly the charm of building your own DIY herb garden. Old cans, windowsills, and a bit of effort are all you need to turn an ordinary kitchen into a little oasis of fresh aromas and vibrant greens. In this intro alone you’re already stepping into a world where recycling becomes creativity, and small steps lead to practical, flavorful results. Let’s explore how you can transform simple discarded cans into a thriving mini garden you’ll love using every day.
Why Old Cans Make Perfect Planters
Aluminum and tin cans might look like plain containers destined for recycling, but their size, sturdiness, and shape make them ideal homes for herbs. They’re easy to clean, simple to decorate, and lightweight enough to arrange anywhere you want. Even better, using old cans cuts down on waste and turns leftover materials into something valuable. When starting your DIY herb garden, you’ll notice how well cans retain soil and support root growth. Plus, their compact shape makes them ideal for tight indoor spaces like kitchen counters or small balconies.
Choosing the Right Herbs for Your Project
What makes a mini herb garden so enjoyable is that you can pick herbs based on what you already love to cook. Basil, mint, parsley, thyme, chives, oregano, or cilantro all grow wonderfully in small containers. Since each herb has slightly different needs, mix and match varieties that thrive in the same amount of light. When planning your DIY herb garden, think about how often you cook with each herb. Basil and mint grow quickly and need frequent trimming, while rosemary and thyme prefer a slower, steadier pace. Selecting herbs intentionally will set you up for success before you even add soil.
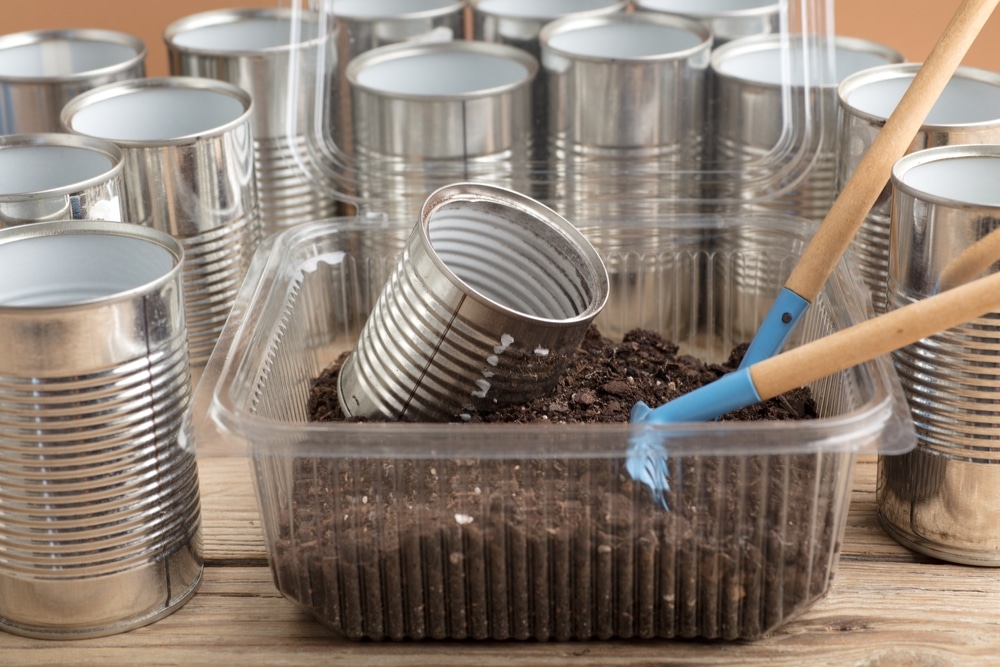
Preparing and Cleaning the Cans for Planting
Turning old cans into safe, functional planters requires a bit of preparation. First, remove the labels by soaking the cans in warm, soapy water. Then scrub away any leftover glue. Next, use a hammer and nail to poke several drainage holes in the bottom. This matters more than most beginners realize because herbs hate soggy soil. A good DIY herb garden always includes proper drainage. Once the holes are made, rinse and dry the cans thoroughly. If the edges of the can feel sharp, sand them lightly or wrap the rim in twine or tape to prevent accidental cuts.
Decorating Your Cans for Personality
This is where creativity shines. Old cans can be painted, wrapped in fabric, covered in rope, or left raw for a rustic industrial look. Some people label their cans with paint pens, while others add magnets to hang them on the fridge. When designing your DIY herb garden, feel free to match your kitchen’s personality. Earth-tone paints create a cottage feel, while bright colors make each herb stand out. The goal isn’t perfection but charm. A mismatched row of hand-decorated cans gives your garden a character that can’t be bought in a store.
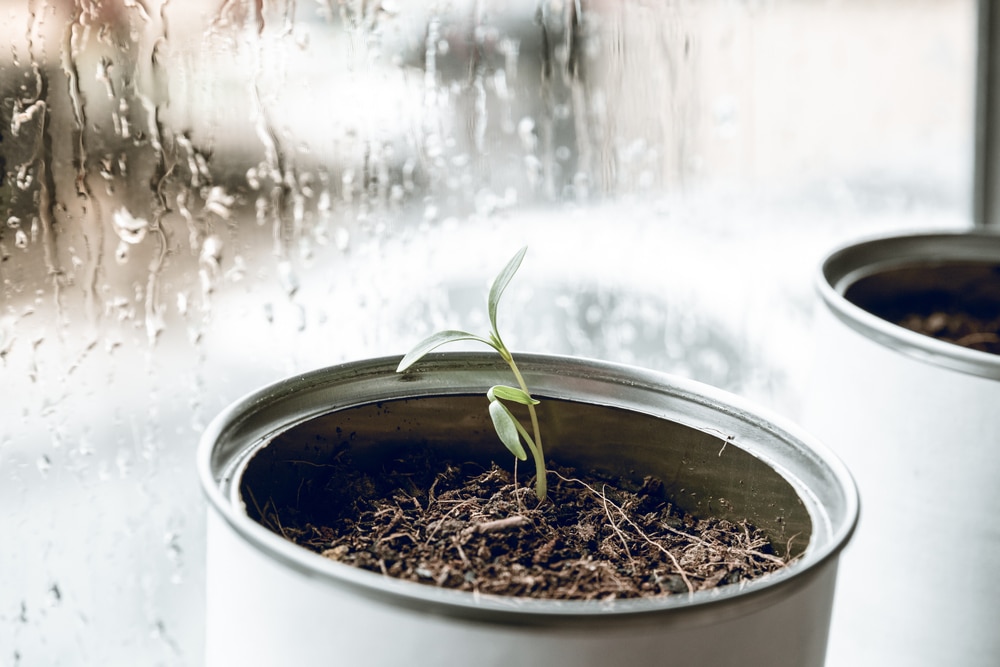
Adding Soil and Planting the Herbs
Now it’s time to bring your mini garden to life. Begin by filling each can with a light potting mix, preferably one meant for vegetables or indoor plants. Avoid using garden soil, as it tends to compact too tightly in small containers. When building a DIY herb garden, soil quality makes a noticeable difference. Insert the herb gently, keeping the roots loose, then pat the soil around it with your fingers. The top of the root ball should sit just below the rim of the can. Water lightly after planting to settle everything in place without flooding the roots.
Finding the Perfect Spot for Growth
Every herb needs sunlight, but how much depends on the variety. Most herbs love six hours of bright, indirect sun. A kitchen windowsill is ideal, but a balcony, patio, or even a desk with a grow light can work beautifully. Pay attention to how your herbs respond over the first week. If they lean toward the light, rotate the cans. A thriving DIY herb garden is one that gets regular care, not just watering but observation. Once you notice how your plants behave, you’ll know exactly where they’re happiest.
Watering and Maintaining Your Mini Garden
Overwatering is the biggest mistake most beginners make. Herbs prefer slightly dry soil, so check with your finger before watering. If the top layer feels dry, give them a gentle drink. If it’s still moist, wait a little longer. A well-kept DIY herb garden also needs occasional trimming. Snipping the top leaves encourages bushier growth, which leads to fuller and healthier plants. Remove any yellowing leaves, and make sure each herb has enough airflow. In small containers, good circulation keeps mold or mildew from forming.
Harvesting and Enjoying Fresh Flavor
The best part of growing herbs is using them. Harvest by pinching or cutting just above a leaf node, which encourages new growth. Fresh basil tossed into pasta, mint steeped in tea, rosemary on roasted potatoes—these simple touches elevate everyday meals. A successful DIY herb garden gives you access to flavors that beat dried herbs every time. The more you harvest, the more your plants grow, creating a rewarding cycle of nurturing and enjoying.
Troubleshooting Common Herb-Growing Problems
Even the healthiest gardens run into challenges. If herbs start to look pale, they may need more sunlight. If leaves droop despite good watering habits, try repotting or adjusting soil drainage. Pests are rare indoors, but if you see tiny bugs, a little soapy water mist can help. Remember that every DIY herb garden goes through minor ups and downs. The key is noticing changes early. Most problems are easy to fix once you understand what the herb is trying to tell you.
Going Beyond the Basics: Expanding Your Herb Collection
Once your first set of herbs is thriving, you might want to add more cans or experiment with different arrangements. Hang cans on a wooden board, mount them to a wall, or stack them on a tiered shelf. A growing DIY herb garden gives you endless possibilities. You can even transplant herbs into larger containers later on if they outgrow their cans. Expansion is a natural next step when you start seeing the results of your effort.

The Keyword Subheader: Making the Most of Your DIY herb garden
Using what you’ve built is just as important as building it. Once you’ve learned how to care for your plants, you’ll start to recognize which herbs pair well with your meals. Fresh chives in scrambled eggs, oregano on pizza, parsley in soups—the options keep growing. A thoughtful DIY herb garden also inspires healthier cooking habits because fresh flavor encourages making meals at home. The convenience of grabbing herbs from a can right beside your stove makes cooking feel more intuitive and fun.
Repurposing More Materials for a Bigger Impact
Old cans are only the beginning. Once you get comfortable with this method, start exploring jars, bowls, small buckets, or containers you never thought could hold plants. Every recycled item keeps waste out of landfills. Expanding your DIY herb garden with other repurposed materials can turn into a long-term eco-friendly hobby. You don’t need fancy gardening supplies. Creativity and consistency matter far more than expensive tools.
Passing the Idea Along to Friends and Family
A mini herb garden crafted from old cans makes a thoughtful, personalized gift. Paint each can to match someone’s kitchen, include handwritten labels, or choose herbs based on dishes they enjoy making. Sharing a DIY herb garden introduces someone else to the joy of growing their own food. It might even inspire them to start recycling more creatively. Gifts that grow—literally—carry a unique charm and last longer than store-bought items.
Building a mini herb sanctuary from old cans is simple, satisfying, and surprisingly impactful. It brings greenery into small spaces, adds flavor to home-cooked meals, and gives ordinary materials a new purpose. A well-loved DIY herb garden becomes more than just a craft project—it becomes a daily source of enjoyment and fresh aroma in your home. Whether you keep it small or expand over time, the effort you put into nurturing your plant collection pays you back in beauty, taste, and a deeper connection to the food you prepare. Grab a few cans, choose your herbs, and let your creativity guide you into something wonderfully useful.
Are you not done yet? Do you want to learn other ways to improve your DIY skills? Then visit our DIY Projects category page.
