
A custom-looking storage wall often seems like something reserved for expensive home renovations, but that is far from the truth. With a little planning, basic tools, and a free weekend, almost anyone can create a polished feature that looks like it was installed by a professional. A well-executed DIY built-in bookshelf can completely transform a living room, office, or bedroom without draining your savings. The secret lies in clever finishing details rather than costly materials. Instead of replacing perfectly good furniture, you can upgrade what you already own and create a stylish focal point that adds personality and practical storage.
Why Built-In Shelves Look So Expensive
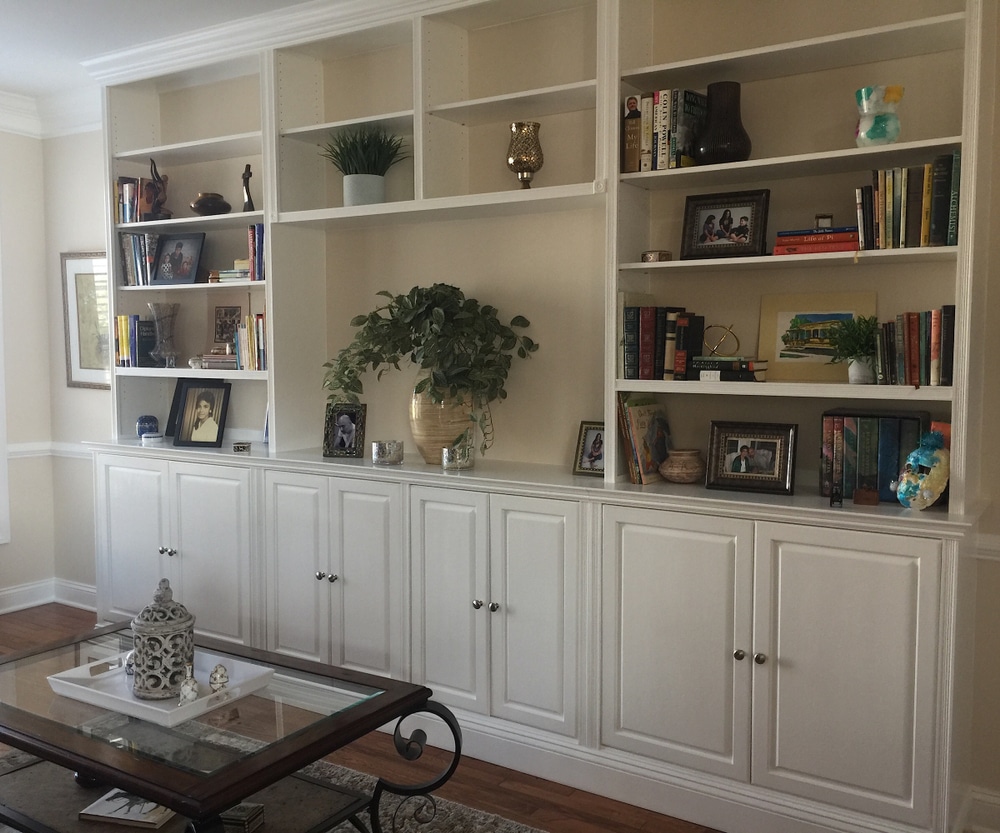
One reason built-in shelving feels luxurious is because it appears to be part of the home’s original architecture. Unlike freestanding furniture, built-ins extend seamlessly from wall to wall or floor to ceiling, creating a clean and intentional appearance. Fortunately, you do not need custom cabinetry to achieve this effect. By placing inexpensive bookcases together and filling the gaps, you can mimic the same style for a fraction of the price. A DIY built-in bookshelf works because your eyes focus on the finished details rather than the individual furniture pieces underneath.
Many homeowners assume that custom carpentry is required to achieve this look, but that is rarely the case. Popular flat-pack bookcases provide an excellent starting point because they are affordable, widely available, and easy to modify. Small additions such as trim boards, crown molding, and baseboards instantly make separate shelves appear like one continuous installation. The result feels permanent without requiring advanced woodworking skills. A DIY built-in bookshelf project often costs hundreds less than professionally installed cabinetry while delivering an equally impressive visual impact.

DIY built-in bookshelf Finishing Details Make the Difference
The biggest transformation happens during the finishing stage rather than the construction process. Even inexpensive shelves become convincing built-ins once visible seams disappear. Small strips of wood can cover the spaces between units, while caulk smooths the remaining joints before painting. Taking extra time during these final steps creates the illusion that everything was built as one solid piece. Many professional-looking projects owe their success more to patience than expensive materials, making this an approachable project for beginners willing to work carefully.
Painting everything the same color ties the entire installation together. Whether you prefer crisp white, warm cream, deep navy, or rich charcoal, one continuous color helps hide the fact that multiple shelves were combined. Many designers also recommend painting the trim and the shelves together after installation instead of beforehand. This approach creates a consistent finish that strengthens the illusion of custom cabinetry. Once completed, a DIY built-in bookshelf often becomes one of the most eye-catching features in the entire room.
Measuring Before You Buy
Careful measurements are the foundation of a successful project. Before purchasing any shelving units, measure your wall width, ceiling height, electrical outlets, vents, and nearby doors or windows. These details help prevent unpleasant surprises during installation. It is also worth checking whether your floors are perfectly level because many homes have slight variations that may require shims underneath the shelves. Spending extra time measuring usually saves hours of frustration later when everything begins coming together.
Planning your layout in advance also helps you determine whether you want symmetrical shelving or a more customized arrangement. Some people leave space in the center for a television, while others prefer uninterrupted rows of bookshelves across the entire wall. Sketching several layouts on paper allows you to visualize the finished result before making purchases. This planning stage also helps estimate the amount of trim, molding, and paint required for your DIY built-in bookshelf, making budgeting much easier from the beginning.

Simple Materials Create Big Results
One of the most appealing aspects of this project is the affordable materials list. Basic MDF boards, pine trim, finishing nails, wood filler, caulk, screws, primer, and paint are usually enough to complete the transformation. If you already own a drill, level, measuring tape, and saw, the total cost stays surprisingly manageable. Even if a few tools need to be borrowed or rented, the overall expense remains significantly lower than ordering custom-built cabinetry from a professional workshop.
Many home improvement stores will even cut larger boards to your measurements, making transportation easier and reducing the amount of cutting required at home. That convenience makes the project much more accessible for beginners without extensive woodworking equipment. Instead of focusing on expensive specialty products, prioritize straight boards and quality paint. Those two factors have a greater influence on the final appearance than premium materials. A DIY built-in bookshelf proves that thoughtful planning often matters more than a generous renovation budget.
Installation Is Easier Than Many Expect
Most installations begin by placing the shelves exactly where they will remain. Once everything is aligned, the units are attached to one another and securely anchored to wall studs using appropriate screws. This step is essential because tall shelving can become unstable if left unsecured. Always follow the manufacturer’s safety recommendations and use hardware suitable for your wall type. Anchoring everything properly not only improves safety but also helps eliminate small movements that could create visible gaps later.
After the shelves are fixed in place, trim pieces can be added around the edges to eliminate empty spaces between the furniture and the surrounding walls. Crown molding near the ceiling and matching baseboards near the floor strengthen the built-in illusion even further. These decorative details require careful measuring but are generally straightforward to install with basic tools. Once the trim is complete, a DIY built-in bookshelf starts looking less like assembled furniture and more like permanent architectural millwork.
Styling Makes Everything Feel Custom
Once construction is finished, styling becomes just as important as the shelves themselves. Instead of filling every inch with books, mix decorative objects throughout the display. Plants, framed photographs, artwork, baskets, ceramics, and travel souvenirs create balance while preventing the shelves from feeling overcrowded. Leaving some empty space allows each item to stand out, producing a cleaner and more curated appearance that resembles professionally designed interiors often featured in magazines and home tours.
Lighting can elevate the finished project even further. Battery-powered puck lights or discreet LED strip lighting add warmth and highlight decorative objects during the evening. Because many modern lighting options require no complicated wiring, installation remains beginner friendly. Combined with thoughtful styling, subtle lighting gives the entire wall additional depth and sophistication. A DIY built-in bookshelf can quickly become both a practical storage solution and the room’s most attractive design feature with only a few finishing touches.
Common Mistakes to Avoid
Rushing through the finishing process is probably the most common mistake people make. Tiny gaps may seem insignificant before painting, but they become much more noticeable once the project is complete. Taking extra time to sand wood filler, smooth caulk lines, and apply multiple thin coats of paint dramatically improves the final result. Patience consistently delivers a cleaner appearance than speed, especially when working on visible areas that will receive daily attention from family members and guests.
Another frequent mistake is overloading the shelves immediately after installation. Books are heavy, and decorative objects add weight as well. Always follow the shelving manufacturer’s weight recommendations and distribute heavier items evenly across the unit. Doing so helps maintain stability and prevents unnecessary stress on the shelves over time. With thoughtful planning, careful installation, and sensible styling, your upgraded wall can remain beautiful and functional for many years without requiring major maintenance or expensive repairs.
Transforming an ordinary bookshelf into something that looks custom-made is one of the most satisfying home improvement projects you can tackle. The process rewards careful planning, attention to detail, and a little patience far more than a large budget. From measuring accurately to adding trim and finishing with paint, every step contributes to a polished appearance that surprises visitors. A DIY built-in bookshelf demonstrates that impressive results do not always require professional contractors or luxury materials. Sometimes, a few smart upgrades are all it takes to make a room feel more elegant, organized, and uniquely yours.
Do you want more amazing tips for DIY Projects in your home? Then visit our DIY Projects page right here